[three.js][typescript] - Material(4)
[three.js][typescript] - Material(3)[three.js][typescript] - Material(2)[three.js][typescript] - Material(1)Three.js 의 Object3D의 파생클래스는 위와 같다. Point는 Geometry를 구성하는 좌표 하나 하나를 렌더링하며 Line은 좌
yoohwanihn.tistory.com
MeshToonMaterial
이번엔 MeshToonMaterial에 대해 알아보자
private setupModels() {
    const material = new THREE.MeshToonMaterial({
    })

    const geomCylinder = new THREE.CylinderGeometry(0.6, 0.9, 1.2, 64, 1)
    const cylinder = new THREE.Mesh(geomCylinder, material)
    cylinder.position.x = -1
    this.scene.add(cylinder)

    const geomTorusknot = new THREE.TorusKnotGeometry(0.4, 0.18, 128, 64)
    const torusknot = new THREE.Mesh(geomTorusknot, material)
    torusknot.position.x = 1
    this.scene.add(torusknot)
  }
setupModels의 material을 MeshToonMaterial 객체로 변경시키고 관련 option과 GUI를 지웠다.
이제 새롭게 추가시켜 보자
먼저 모델을 표현하기 위한 색상을 지정하기 위해 이미지가 필요하다.

public 폴더에 사용할 이미지 파일을 업로드한다.

three.js/data at main · yoohwanihn/three.js
[three.js][typescript]. Contribute to yoohwanihn/three.js development by creating an account on GitHub.
github.com
해당 이미지는 github에 올려놓았다.
이제 코드를 통해 이미지를 로드해야 하는데,
Three.js는 이미지를 로드할 때 Texture 객체로 만들어 사용해야 한다.

다음과 같이 Texture 타입으로 이미지를 로드하여 NearestFilter로 minFilter와 magFilter를 지정해주어야 한다.

그리고 gradientMap 속성을 toonTexture로 지정하고 결과를 확인해 보자

위와 같이 재질이 검은색으로 나타나는데 이는 저번글에서 학습했듯 광원이 재질과 맞지 않아서 그렇다.
MeshToonMaterial은 HDRI 광원을 지원하지 않는다.
그래서 우리는 광원 코드(setupLight)를 수정해야 한다
private setupLight() {
    const light = new THREE.DirectionalLight(0xffffff, 1)
    light.position.set(1,2,1)
    this.scene.add(light)

    /** HDRI */
    // const rgbeLoader = new RGBELoader()  //HDRI를 사용하기 위한 로더 객체
    // rgbeLoader.load('./red_hill_cloudy_4k.hdr', (environmentMap) => {
    //   environmentMap.mapping = THREE.EquirectangularRefractionMapping
    //   this.scene.background = environmentMap
    //   this.scene.environment = environmentMap
    // })
  }
HDRI 대신 기존에 사용했던 DirectionalLight 광원을 사용하였다.
결과를 확인해 보자
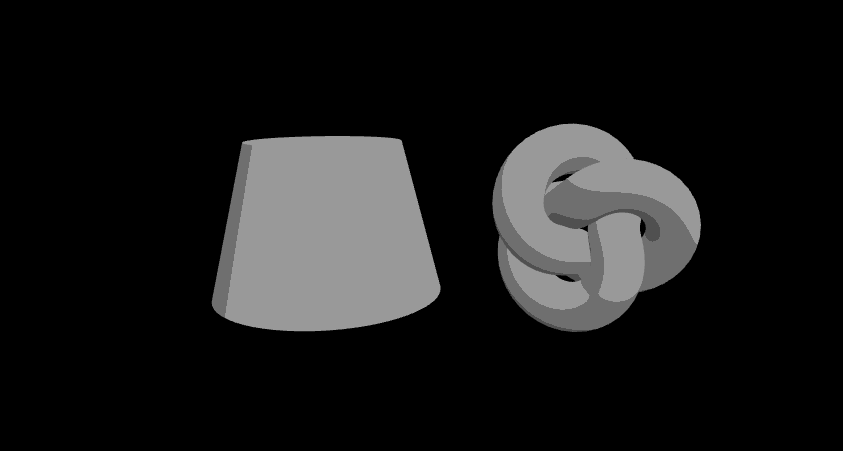
카툰처럼 mesh의 색이 입혀진 모습을 확인할 수 있다.
젤다의 전설과 같은 카툰풍의 이미지를 렌더링 할 때 사용하면 된다.
이제 텍스쳐 맵핑에 대해 알아보자
Texture Mapping

텍스쳐 맵핑을 사용하면 훨씬 사실적인 표현이 가능해진다.
텍스쳐는 이미지로부터 만들어지는데, 이 텍스쳐를 박스 모델의 면에 붙여서 렌더링 할 수 있다.
이처럼 모델에 텍스쳐를 붙이는 것을 텍스쳐 맵핑이라고 한다.

Mesh에 대한 재질에서 적용할 수 있는 텍스쳐 맵핑 속성들이다.
맵핑에 대한 다양한 속성이 존재하지만 이 중 가장 기본적인 속성은 map 속성이다.
이 map 속성에 Texture를 지정하면 모델 표면에 지정된 Texture가 맵핑돼서
Texture 이미지 색상으로 모델이 표현된다.
표에서 볼 수 있듯 모든 mesh에 적용할 수 있다.
그럼 이 중 가장 많이 사용되는 MeshStandardMaterial의 map속성에 Texture를 맵핑해 보자.

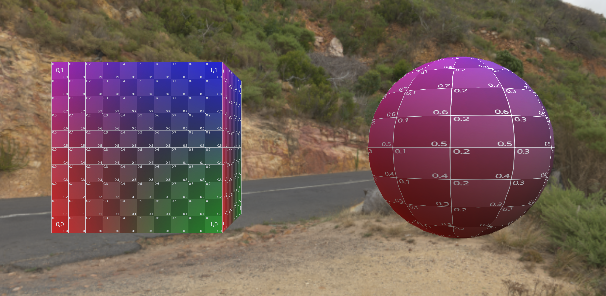
우선 github에서 uv_grid_opengl.jpg를 다운로드하여 public 폴더에 업로드한다.

해당 이미지는 위와 같으며, 이를 TextureMapping 할 것이다.
import * as THREE from 'three'
import { OrbitControls, RGBELoader } from 'three/examples/jsm/Addons.js'
import './style.css'
import GUI from 'three/examples/jsm/libs/lil-gui.module.min.js'
class App {
private renderer: THREE.WebGLRenderer //Renderer Field 추가
private domApp: Element
private scene: THREE.Scene
private camera?: THREE.PerspectiveCamera //?를 붙이면 PerspectiveCamera Type이나 Undefined Type을 가질 수 있음.(Optional Properties)
constructor() {
console.log("YooHwanIhn");
this.renderer = new THREE.WebGLRenderer({ antialias: true }) // 안티-알리아스 : 높은 렌더링 결과를 얻기 위해 픽셀 사이에 계단 현상을 방지하는 효과 추가
this.renderer.setPixelRatio(Math.min(2, window.devicePixelRatio)) // 고해상도에서 깨짐 방지를 위해 픽셀 비율 지정
this.domApp = document.querySelector('#app')!
this.domApp.appendChild(this.renderer.domElement) // renderer.domeElement : canvas Type의 DOM 객체
this.scene = new THREE.Scene()
this.setupCamera()
this.setupLight()
this.setupModels()
this.setupEvents()
}
private setupCamera() {
const width = this.domApp.clientWidth
const height = this.domApp.clientHeight
this.camera = new THREE.PerspectiveCamera(75, width / height, 0.1, 100)
this.camera.position.z = 2 // (0, 0, 2)
new OrbitControls(this.camera, this.domApp as HTMLElement)
}
private setupLight() {
// const light = new THREE.DirectionalLight(0xffffff, 1)
// light.position.set(1,2,1)
// this.scene.add(light)
/** HDRI */
const rgbeLoader = new RGBELoader() //HDRI를 사용하기 위한 로더 객체
rgbeLoader.load('./red_hill_cloudy_4k.hdr', (environmentMap) => {
environmentMap.mapping = THREE.EquirectangularRefractionMapping
this.scene.background = environmentMap
this.scene.environment = environmentMap
})
}
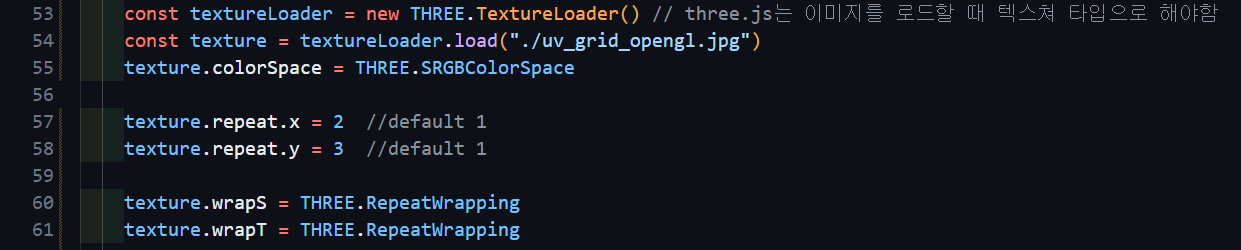
private setupModels() {
const textureLoader = new THREE.TextureLoader() // three.js는 이미지를 로드할 때 텍스쳐 타입으로 해야함
const texture = textureLoader.load("./uv_grid_opengl.jpg")
const material = new THREE.MeshStandardMaterial({
map: texture
})
const geomBox = new THREE.BoxGeometry(1, 1, 1)
const box = new THREE.Mesh(geomBox, material)
box.position.x = -1
this.scene.add(box)
const geomSphere = new THREE.SphereGeometry(0.6)
const sphere = new THREE.Mesh(geomSphere, material)
sphere.position.x = 1
this.scene.add(sphere)
}
//실제 이벤트와 렌더링 처리를 다룰 메서드
private setupEvents() {
window.onresize = this.resize.bind(this); // html의 size가 변경될 때마다 호출되는 함수(addEventListener 느낌??)
this.resize();
this.renderer.setAnimationLoop(this.render.bind(this)) // 연속적으로 render 메서드 호출(모니터 Frame에 맞게)
}
// html창 resize시 호출할 함수
private resize() {
const width = this.domApp.clientWidth
const height = this.domApp.clientHeight
//앞선 setUpCamera에서 설정한 camera 정보를 다시 수정해줌.
const camera = this.camera
if (camera) {
camera.aspect = width / height
camera.updateProjectionMatrix() // 카메라의 값이 변경되었다면 수정하도록 함.
}
//renderer도 마찬가지로 사이즈 수정함
this.renderer.setSize(width, height)
}
private update(time: number) {
time *= 0.001 // ms -> s 단위로 변경
}
private render(time: number) {
// time : setAnimationLoop의 값에 의해서 결정되는데 단위는 ms
this.update(time)
this.renderer.render(this.scene, this.camera!)
}
}
new App()
전체 코드는 위와 같다.
DirectionalLight 광원 대신 다시 HDRI를 사용하고 Geometry를 Box와 Sphere로 변경시켰으며,
재질은 MeshToonMaterial에서 MeshStandardMaterial로 다시 변경시켰다.
결과는 아래와 같다.

그런데 원래 이미지(uv_grid_opengl.jpg)보다 채도가 좀 떨어져 보인다.
왜냐하면 texture의 ColorSpace를 설정해주어야 하기 때문이다.

texture의 ColorSpace를 SRGBColorSpace로 적용한다.

채도가 더 선명해졌다.

해당 이미지의 색 대표가 sRGB로 되어있기 때문이다.
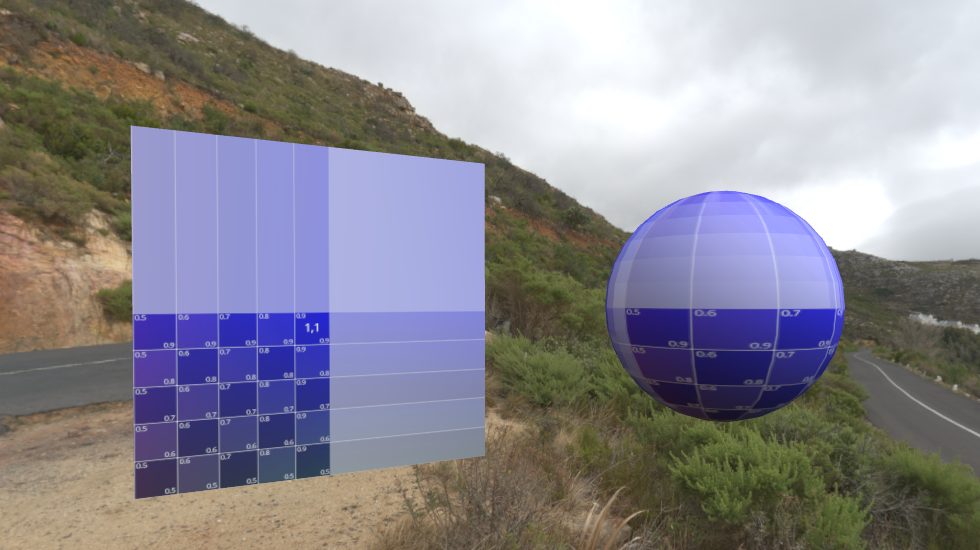
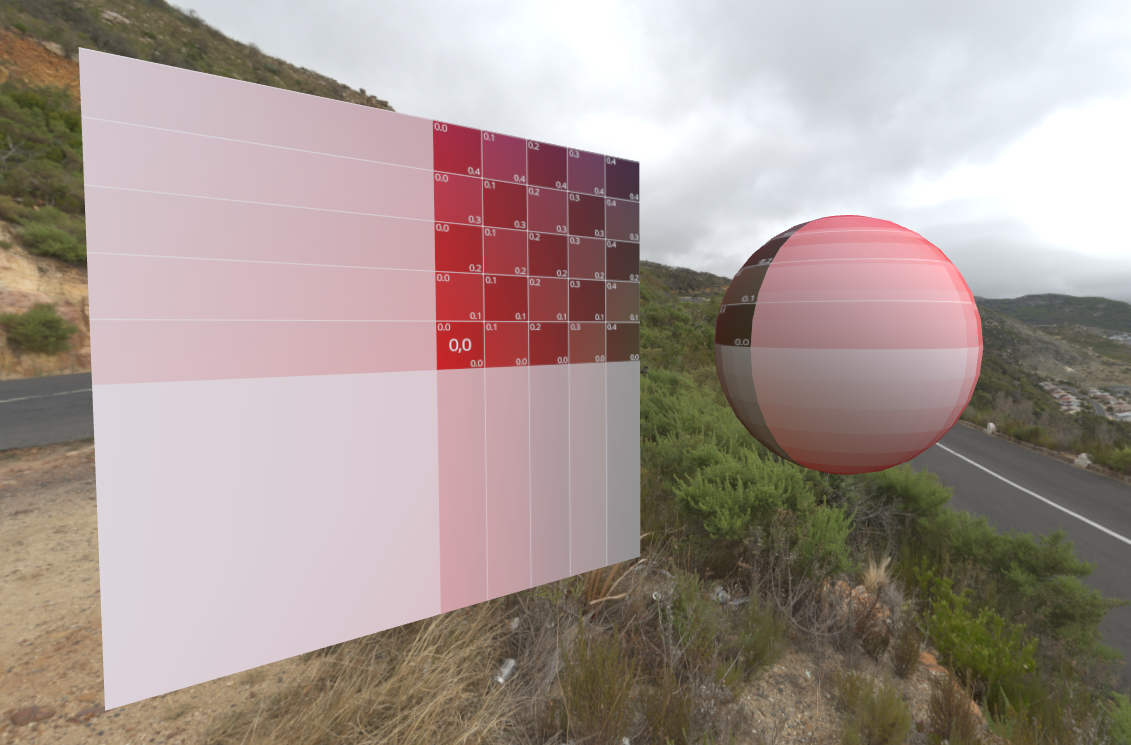
UV 좌표
기본적으로 Texture Mapping은 UV 좌표 개념으로 되어있다.
이 UV 좌표는 Three.js에서 제공되는 Geometry에 기본적으로 지정되어 있다.
지정된 UV 좌표대로 Box와 Sphere에 Texture가 Mapping 되는 것이다.

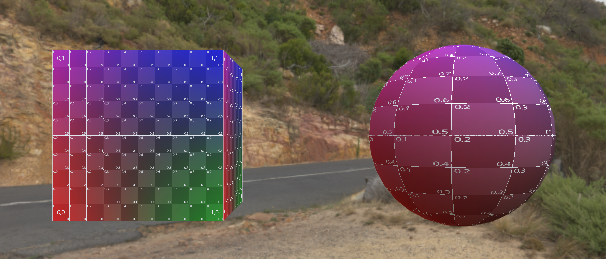
위에서 사용했던 이미지(uv_grid_opengl.jpg)는 Three.js에서의 UV 좌표를 보여준다.
U는 수평방향, V는 수직방향에 대한 축이다.
오른쪽 삼각형 이미지를 예시로 들 때, 1번 정점과 2번 정점 사이의 색은
이미지 상의 거리값에 따라 보관하여 결정된다.
코드를 통해 알아보자.
이미지와 같이 setupModels에 코드를 추가해 준다.
이미지를 로드해서 저장한 texture 값의 반복 횟수와 wrapping을 설정해 주는 코드이다.
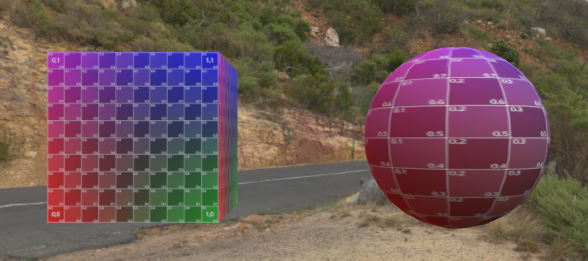
결과는 다음과 같다.

repeat 설정한 x의 값과 y의 값만큼 반복된다.
이번엔 wrapping의 종류를 바꿔보자

ClampToEdgeWrapping으로 바꾸어 보자

처음에만 이미지가 wrapping 되고 그 이후부터는 이미지의 끝 픽셀로 나머지 영역을 채우는 것을 알 수 있다.
이번에는 MirroredRepeateWrapping으로 변경시켜 보자


짝수번째 repeat 마다 거울에 반사된 모습으로 Texture가 Mapping 되어 렌더링 된다.
그리고 offset을 알아보자

다음과 같이 UV좌표의 x축, y축 시작 위치를 0.5로 변경시켰다.
그리고 이를 확인하기 쉽게 처음에 사용하였던 ClampToEdgeWrapping으로 확인해 보자.
결과는 다음과 같다.
x축, y축을 각각 0.5부터 시작하기 때문에 1/4 면적만 렌더링 되며
마지막 렌더링 된 값의 채도로 빈 면이 색칠되는 것을 확인할 수 있다.

만약 offset을 음수로 바꾼다면
이미지가 우측 상단 방향으로 0.5만큼 이동되어 매핑되었다.
이번엔 rotation을 시켜보자
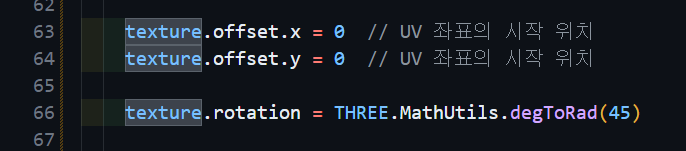
offset을 default값인 0으로 변경시킨 뒤 45 radian만큼 texture를 회전시켜 보자

회전의 기준 좌표는 default인 (0, 0)으로 회전되었으며,

UV 기준 좌표를 (0.5, 0.5)로 변경시키면

위와 같은 결과를 확인할 수 있다.
Texture 이미지가 렌더링 될 때 filter의 값을 설정해 보자.

기존 이미지 크기보다 더 축소되어 렌더링 할 때 magFilter는 LinearFilter를,
minFilter는 NearestMipMapLinearFilter를 사용한다.
참고로 두 값은 모두 Default 값이다.
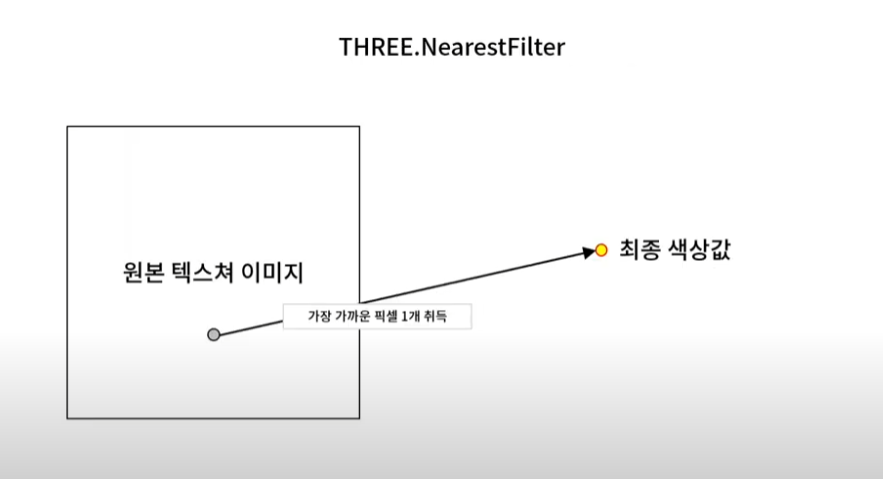
먼저 magFilter에 대한 LinearFilter는 가장 가까운 4개의 픽셀 색상을 얻어와서 선형 보관한 색상값을 사용한다.
만약 NearestFilter를 사용한다면 다른 결과가 나올 것이다.
NearestFilter는 단순히 가장 가까운 한 개의 픽셀만을 가져와서 그 색상을 사용하기 때문이다.
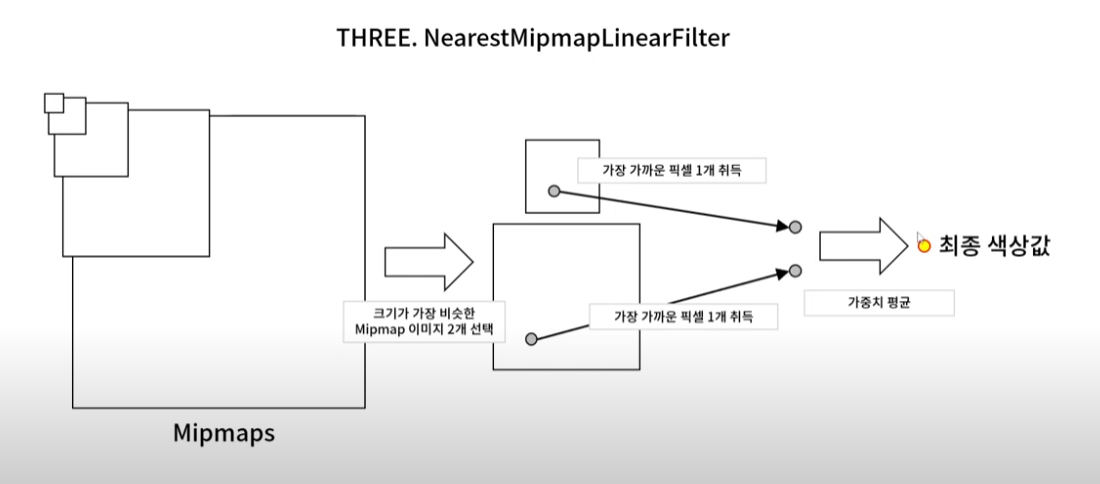
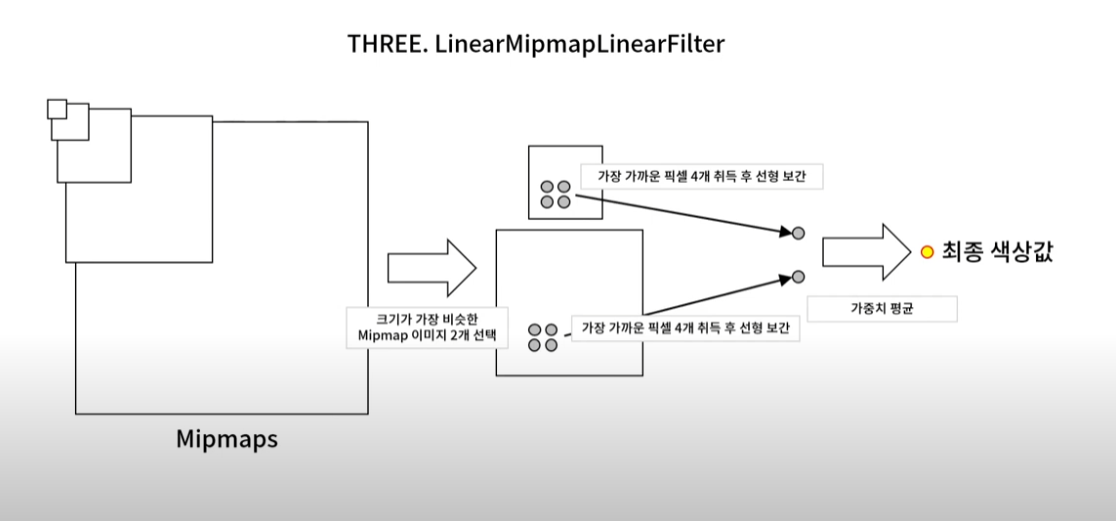
그리고 minFilter의 NearestMipMapLinearFilter를 이해하기 위해선 먼저 MipMap의 개념에 대해 이해하여야 한다.

MipMap은 원래의 이미지 크기를 절반으로 줄여서 미리 만들어놓은 이미지 셋(집합)이다.
이 MipMap데이터는 별도의 설정 없이 Three.js가 자동으로 저장해 준다.
앞서 말했듯 minFilter의 기본 값은 NearestMipMapLinearFilter인데,
Mesh가 작게 보이도록 하면 원래 Texture 이미지 크기보다 더 작게 표시될 것이며
이때 minFilter가 사용된다.
 |
 |
 |
 |
 |
 |
 |
 |
 |
 |
 |
 |
 |
 |
 |
 |
 |
 |

정리하면 다음과 같다.
결과적으로 MipMap을 사용하는 것이 렌더링 품질은 높지만 항상 옳은 것은 아니다
Text데이터는 GPU 메모리를 가장 많이 소모하는 자원중 하나인데 MipMap을 사용하면 이러한 메모리 사용이 증가한다.
그렇기 때문에 사용하는 Texture Mapping의 크기와 상황 등에 따라 적절한 minFilter 값을 지정해 주는 것이 좋다.
그러나 대부분 기본값인 NearestMipmapLinearFilter를 사용해도 무방하다.
전체 코드(main.ts)
import * as THREE from 'three'
import { OrbitControls, RGBELoader } from 'three/examples/jsm/Addons.js'
import './style.css'
import GUI from 'three/examples/jsm/libs/lil-gui.module.min.js'

class App {
  private renderer: THREE.WebGLRenderer //Renderer Field 추가
  private domApp: Element
  private scene: THREE.Scene
  private camera?: THREE.PerspectiveCamera //?를 붙이면 PerspectiveCamera Type이나 Undefined Type을 가질 수 있음.(Optional Properties)

  constructor() {
    console.log("YooHwanIhn");
    this.renderer = new THREE.WebGLRenderer({ antialias: true }) // 안티-알리아스 : 높은 렌더링 결과를 얻기 위해 픽셀 사이에 계단 현상을 방지하는 효과 추가
    this.renderer.setPixelRatio(Math.min(2, window.devicePixelRatio)) // 고해상도에서 깨짐 방지를 위해 픽셀 비율 지정

    this.domApp = document.querySelector('#app')!
    this.domApp.appendChild(this.renderer.domElement) // renderer.domeElement : canvas Type의 DOM 객체

    this.scene = new THREE.Scene()

    this.setupCamera()
    this.setupLight()
    this.setupModels()
    this.setupEvents()
  }

  private setupCamera() {
    const width = this.domApp.clientWidth
    const height = this.domApp.clientHeight

    this.camera = new THREE.PerspectiveCamera(75, width / height, 0.1, 100)
    this.camera.position.z = 4  // (0, 0, 4)

    new OrbitControls(this.camera, this.domApp as HTMLElement)
  }

  private setupLight() {
    // const light = new THREE.DirectionalLight(0xffffff, 1)
    // light.position.set(1,2,1)
    // this.scene.add(light)

    /** HDRI */
    const rgbeLoader = new RGBELoader()  //HDRI를 사용하기 위한 로더 객체
    rgbeLoader.load('./red_hill_cloudy_4k.hdr', (environmentMap) => {
      environmentMap.mapping = THREE.EquirectangularRefractionMapping
      this.scene.background = environmentMap
      this.scene.environment = environmentMap
    })
  }

  private setupModels() {
    const textureLoader = new THREE.TextureLoader() // three.js는 이미지를 로드할 때 텍스쳐 타입으로 해야함
    const texture = textureLoader.load("./uv_grid_opengl.jpg")
    texture.colorSpace = THREE.SRGBColorSpace

    texture.repeat.x = 1  //default 1
    texture.repeat.y = 1  //default 1

    texture.wrapS = THREE.ClampToEdgeWrapping
    texture.wrapT = THREE.ClampToEdgeWrapping

    texture.offset.x = 0  // UV 좌표의 시작 위치
    texture.offset.y = 0  // UV 좌표의 시작 위치

    // texture.rotation = THREE.MathUtils.degToRad(45)
    // texture.center.x = 0.5
    // texture.center.y = 0.5

    texture.magFilter = THREE.LinearFilter // Texture 이미지 원래 크기보다 더 축소되어 렌더링 될 때 쓰는 필터
    texture.minFilter = THREE.LinearMipMapLinearFilter  // Texture 이미지 원래 크기보다 더 축소되어 렌더링 될 때 쓰는 필터
    texture.minFilter = THREE.NearestFilter
    texture.minFilter = THREE.LinearFilter
    texture.minFilter = THREE.NearestMipmapNearestFilter
    texture.minFilter = THREE.LinearMipmapNearestFilter
    texture.minFilter = THREE.LinearMipmapLinearFilter

    const material = new THREE.MeshStandardMaterial({
      map: texture
    })

    const geomBox = new THREE.BoxGeometry(1, 1, 1)
    const box = new THREE.Mesh(geomBox, material)
    box.position.x = -1
    this.scene.add(box)

    const geomSphere = new THREE.SphereGeometry(0.6)
    const sphere = new THREE.Mesh(geomSphere, material)
    sphere.position.x = 1
    this.scene.add(sphere)
  }

  //실제 이벤트와 렌더링 처리를 다룰 메서드
  private setupEvents() {
    window.onresize = this.resize.bind(this); // html의 size가 변경될 때마다 호출되는 함수(addEventListener 느낌??)
    this.resize();

    this.renderer.setAnimationLoop(this.render.bind(this)) // 연속적으로 render 메서드 호출(모니터 Frame에 맞게)
  }

  // html창 resize시 호출할 함수
  private resize() {
    const width = this.domApp.clientWidth
    const height = this.domApp.clientHeight

    //앞선 setUpCamera에서 설정한 camera 정보를 다시 수정해줌.
    const camera = this.camera
    if (camera) {
      camera.aspect = width / height
      camera.updateProjectionMatrix() // 카메라의 값이 변경되었다면 수정하도록 함.
    }

    //renderer도 마찬가지로 사이즈 수정함
    this.renderer.setSize(width, height)
  }

  private update(time: number) {
    time *= 0.001 // ms -> s 단위로 변경
  }

  private render(time: number) {
    // time : setAnimationLoop의 값에 의해서 결정되는데 단위는 ms
    this.update(time)

    this.renderer.render(this.scene, this.camera!)
  }
}

new App()'three.js' 카테고리의 다른 글
| [three.js][typescript] - Material(7) (0) | 2024.07.12 |
|---|---|
| [three.js][typescript] - Material(6) (0) | 2024.07.11 |
| [three.js][typescript] - Material(4) (0) | 2024.07.10 |
| [three.js][typescript] - Material(3) (0) | 2024.07.08 |
| [three.js][typescript] - Material(2) (0) | 2024.07.05 |


